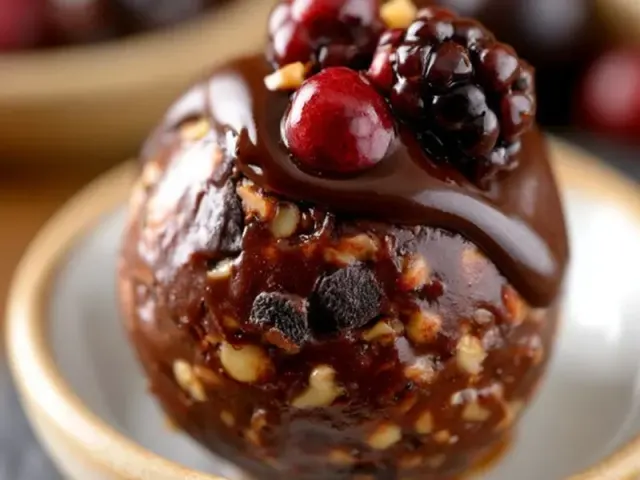
No-Bake Chocolate Energy Balls for Camping Fuel
The first time I packed chocolate energy balls for a backpacking trip, I pulled them out at lunch to find a sticky, melted mess smeared across my Ziploc bag. Lesson learned. These no-bake bites are brilliant camp food — dense calories, real chocolate flavor, zero cook time — but they need a little technique to survive the trail.

Here's the trick that changed everything: a short chill before rolling, plus a pinch of salt. The salt doesn't just balance sweetness; it helps the fats in the peanut butter bind more tightly, so the balls stay firm longer. And the 15-minute fridge rest? That's the difference between a perfectly round snack and a handful of crumbles.
Why These Work for Tent Camping
You need food that fuels without fuss. These energy balls deliver protein from the peanut butter, slow-burning carbs from the oats, and a quick hit of antioxidants from the cocoa. No stove needed. No cleanup beyond one bowl and a spoon. They pack flat in a bag and don't require a cooler — as long as you follow the heat-proofing step below.
The Heat-Proofing Method
Camping in summer means everything softens. Here's how to keep these balls trail-ready:
- Use natural peanut butter — the kind that separates. Stir it well before mixing. Natural peanut butter has less added oil and sugar, so it melts less at warm temperatures.
- Chill the dough for a full 15 minutes before rolling. Cold dough rolls into dense balls that hold shape.
- Let the rolled balls rest at room temperature for 10 minutes. This creates a slightly dry outer skin that prevents sticking.
- Pack them with a frozen water bottle inside an insulated lunch bag. The bottle thaws as you hike, and the balls stay cool for 6–8 hours.
If you're camping in cool weather (below 70°F), skip the insulated bag — just tuck the container in the middle of your pack, away from direct sun.
One Mistake to Avoid
Don't skip the salt. I know it sounds minor, but salt does two things: it amplifies the chocolate flavor without adding sweetness, and it helps the dough bind. Without it, the balls taste flat and crumble more easily. Use fine sea salt — table salt works too, but use a scant 1/4 teaspoon.
Adapting for Different Conditions
Rainy or humid weather: Add an extra tablespoon of oats. Humidity softens the dough. The extra dry ingredient keeps the balls firm.
Cold weather: The dough will be stiff. Let it sit at room temperature for 5 minutes before rolling. Your hands will warm it enough to shape.
Camping with kids: Let them roll their own balls. It's a great campsite activity. Just make sure little hands are clean — or use disposable gloves.
High altitude: No changes needed. The recipe works at 8,000 feet as-is.
Storing Leftovers
Any balls that survive the trip can be refrigerated for up to a week at home. They also freeze beautifully for up to three months — just thaw in the fridge overnight before your next outing.
The Takeaway
These chocolate energy balls are the camp snack that keeps you moving. Rich, fudgy, and built to handle real trail conditions. The chill-before-rolling trick is the one detail most recipes leave out — and it makes all the difference. Make a batch before your next trip. Your hiking legs will thank you.
Frequently Asked Questions
Can I use almond butter instead of peanut butter?
Absolutely. Almond butter, cashew butter, or sunflower seed butter all work. Just note that sunflower butter can turn the balls slightly green after a day or two due to a natural reaction with the cocoa — it's harmless and still tastes fine.
How long do these energy balls last without refrigeration?
In cool weather (under 70°F), they stay good for a full day in your pack. In hot weather, use the heat-proofing trick in the article: store them in a small insulated bag with a frozen water bottle, and they'll last 6–8 hours safely.
Can I make these vegan?
Yes. Replace the honey with maple syrup or agave nectar, and use dairy-free chocolate chips. The texture will be slightly stickier, so chill the mixture for 15 minutes before rolling.
What if the mixture is too dry to roll into balls?
Add warm water one teaspoon at a time until the dough holds together when pinched. Too sticky? Add a tablespoon of oat flour or extra oats.
No-Bake Chocolate Energy Balls for Camping Fuel

These no-bake chocolate energy balls are the perfect camping snack: rich, fudgy, and packed with oats and peanut butter for sustained energy. The trick? A pinch of salt and a short chill before rolling keep them from turning into a melty mess on the trail.
- 1 cup rolled oats (old-fashioned rolled oats)
- 1/2 cup peanut butter (natural, no sugar added)
- 1/4 cup honey (or maple syrup for vegan)
- 3 tablespoons cocoa powder (unsweetened)
- 1/4 cup dark chocolate chips (mini or finely chopped)
- 1/4 teaspoon salt (fine sea salt)
- 1 teaspoon vanilla extract (optional, for deeper flavor)
- Line a small baking sheet or plate with parchment paper.
- In a medium bowl, combine the rolled oats, cocoa powder, and salt. Stir until the cocoa is evenly distributed — no white streaks.
- Add the peanut butter, honey (or maple syrup), and vanilla extract. Stir with a sturdy spatula until a thick, uniform dough forms. It should feel slightly sticky but not wet.
- Fold in the dark chocolate chips. The dough will stiffen as the chips are incorporated.
- Chill the mixture in the refrigerator for 15 minutes. This is the critical step: cold dough rolls into firm balls that hold their shape, even in a warm pack.
- Scoop out rounded tablespoons of the dough. Roll firmly between your palms into smooth balls. If the dough warms up and gets too soft, pop it back in the fridge for 5 minutes.
- Place the balls on the parchment-lined sheet. Let them rest at room temperature for 10 minutes — this sets the outer layer so they don't stick together when packed.
- Transfer to an airtight container or a reusable zip-top bag. Store in a cool spot in your pack. For hot-weather trips, nestle the container next to a frozen water bottle inside an insulated lunch bag.
Recipe: No-Bake Chocolate Energy Balls for Camping Fuel
Ingredients
- 1 cup rolled oats (old-fashioned rolled oats)
- 1/2 cup peanut butter (natural, no sugar added)
- 1/4 cup honey (or maple syrup for vegan)
- 3 tablespoons cocoa powder (unsweetened)
- 1/4 cup dark chocolate chips (mini or finely chopped)
- 1/4 teaspoon salt (fine sea salt)
- 1 teaspoon vanilla extract (optional, for deeper flavor)
Instructions
- Line a small baking sheet or plate with parchment paper.
- In a medium bowl, combine the rolled oats, cocoa powder, and salt. Stir until the cocoa is evenly distributed — no white streaks.
- Add the peanut butter, honey (or maple syrup), and vanilla extract. Stir with a sturdy spatula until a thick, uniform dough forms. It should feel slightly sticky but not wet.
- Fold in the dark chocolate chips. The dough will stiffen as the chips are incorporated.
- Chill the mixture in the refrigerator for 15 minutes. This is the critical step: cold dough rolls into firm balls that hold their shape, even in a warm pack.
- Scoop out rounded tablespoons of the dough. Roll firmly between your palms into smooth balls. If the dough warms up and gets too soft, pop it back in the fridge for 5 minutes.
- Place the balls on the parchment-lined sheet. Let them rest at room temperature for 10 minutes — this sets the outer layer so they don't stick together when packed.
- Transfer to an airtight container or a reusable zip-top bag. Store in a cool spot in your pack. For hot-weather trips, nestle the container next to a frozen water bottle inside an insulated lunch bag.