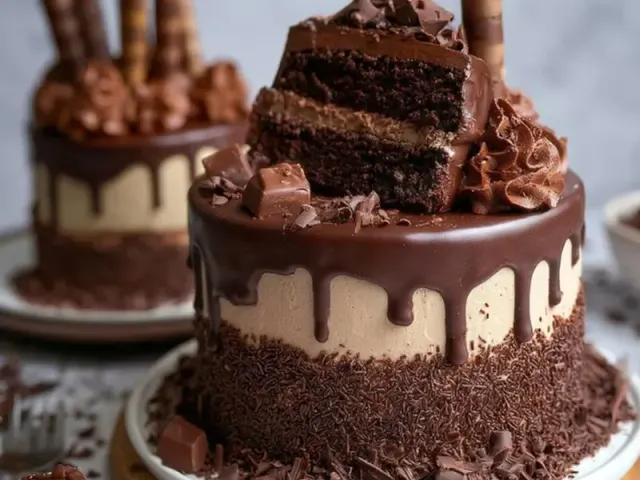
Chocolate Tiered Cake: Broke Pinterest
The first cake I tried to stack looked like a leaning tower of chocolate rubble. The layers slid. The frosting cracked. I had pinned a glossy, three-tier masterpiece, and what I got was a delicious mess. But that mess taught me exactly what I needed to change. If your chocolate tiered cake broke Pinterest, I can help you fix it.

The Real Problem with Pinterest Cakes
Most Pinterest photos skip the messy middle. They show a perfect stack, but not the structural work that holds it together. A tiered cake is part baking, part engineering. The good news: you don't need fancy equipment. You just need the right method.
Bake for Structure, Not Just Flavor
A moist cake is lovely, but a too-moist cake will sag under its own weight. For a tiered cake, you want a recipe that's sturdy enough to stack. My go-to uses buttermilk and hot coffee for richness, but the real trick is baking until a toothpick comes out with just a few moist crumbs—not wet batter. Overbaking by even two minutes can dry the edges, so set a timer and check early.
Use three 8-inch pans, not 9-inch. The smaller diameter gives you taller layers, which look more dramatic and are easier to handle. Line the bottoms with parchment paper cut exactly to size—no folding, no guessing. Trace the pan on the paper with a pencil, then cut just inside the line.
Leveling: The Non-Negotiable Step
Even if your cake looks flat, it's not. Every cake domes in the center. If you stack two domed layers, the cake will wobble like a seesaw. Use a serrated knife and a gentle sawing motion to cut off the dome. Hold the knife level by resting it on the edge of the pan as a guide. Save the scraps for snacking or crumble into a trifle later.
I also flip the bottom layer upside down so its flattest side is on the board. That gives you a rock-solid base.
The Crumb Coat Is Your Safety Net
This is where most Pinterest fails happen. A crumb coat is a thin layer of frosting that seals in all the loose crumbs. It doesn't have to be pretty. Slather it on, then refrigerate for at least 30 minutes. The frosting firms up, trapping the crumbs and creating a smooth surface for the final coat. Without this step, your final layer will look speckled and messy.
For the final coat, use a bench scraper or a large offset spatula. If you don't have a turntable, place the cake board on an upside-down bowl. Turn the bowl slowly with one hand while holding the scraper steady against the side. Two or three rotations and the sides will be glass-smooth.
Stacking Without Sliding
Use a dab of frosting on the cake board to glue the first layer in place. Then pipe a ring of frosting around the edge of each layer before adding the filling. That ring acts as a dam, keeping the filling from squishing out the sides. Fill the center with a generous amount of frosting—about 1/2 cup per layer for an 8-inch cake.
After stacking the second layer, press down gently with a flat hand. You want the layers to settle evenly, not squish. If you see the filling oozing out, you used too much. Next time, use a little less.
Chill Before You Decorate
Once the cake is fully stacked and crumb-coated, refrigerate it for at least an hour. Cold cake is stable cake. It won't shift when you add the final frosting, and the frosting itself will set more cleanly. If you're camping and don't have a fridge, use a cooler with a good layer of ice packs. Wrap the cake in plastic wrap first, then place it inside a hard-sided container to protect it from shifting ice.
A Note on Camping with Cake
Transporting a tiered cake to a campsite takes planning. I assemble the whole cake at home, then refrigerate it overnight. The next morning, I wrap it tightly in plastic wrap, then a layer of foil. It goes into a hard-sided cooler, surrounded by ice packs, with a towel on top to prevent sliding. At the campsite, I set it on a flat table in the shade. If it's hot, I keep it in the cooler until just before serving. A cake that sits out for more than two hours in warm weather should be eaten or re-chilled—food safety matters even in the woods.
Takeaway
That leaning, cracking cake I started with? It still tasted good. But with a few adjustments—leveling, a proper crumb coat, and a good chill—the next one stood tall and smooth. Pinterest can show you the dream, but these steps are how you actually get there.
Frequently Asked Questions
Why did my cake layers crack when stacking?
Cracking usually means the cake was too dry or the layers weren't level. Bake just until a toothpick comes out clean, and always level the domed tops. Also, chill the layers for at least an hour before stacking—cold cake is much sturdier.
How do I get frosting smooth without a turntable?
Use a large offset spatula and a bench scraper. Place the cake on a cake board that sits on an upside-down bowl. Turn the bowl slowly with one hand while holding the scraper steady against the frosting. A few thin layers (crumb coat, chill, then final coat) work wonders.
Can I make this cake ahead of time for a camping trip?
Yes. Bake and fully assemble (including frosting) at home, then refrigerate overnight. Wrap the entire cake in plastic wrap, then a layer of foil, and place in a hard-sided cooler. At the campsite, let it sit at room temperature for 30 minutes before serving.
Chocolate Tiered Cake: Broke Pinterest

A rich, moist chocolate cake with a silky chocolate buttercream, built for stability and wow-factor. Perfect for celebrating a special campout.
- 2 cups all-purpose flour (sifted)
- 2 cups sugar (granulated)
- 3/4 cup cocoa powder (unsweetened)
- 2 teaspoons baking soda
- 1 teaspoon baking powder
- 1 teaspoon salt
- 1 cup buttermilk (buttermilk, room temperature)
- 1/2 cup vegetable oil (vegetable oil)
- 2 large eggs (room temperature)
- 2 teaspoons vanilla extract
- 1 cup hot coffee (hot coffee)
- 1 1/2 cups unsalted butter (softened)
- 5 cups powdered sugar (sifted)
- 3/4 cup cocoa powder (unsweetened)
- 1/2 cup heavy cream (heavy cream, plus more if needed)
- 2 teaspoons vanilla extract
- Preheat the oven to 350°F (175°C). Grease and flour three 8-inch round cake pans.
- In a large bowl, whisk together the flour, sugar, cocoa powder, baking soda, baking powder, and salt.
- Add the buttermilk, oil, eggs, and vanilla. Beat on medium speed for 2 minutes.
- Stir in the hot coffee until just combined (batter will be thin).
- Divide batter evenly among the pans. Bake 25-30 minutes, until a toothpick comes out clean.
- Cool in pans for 10 minutes, then turn out onto wire racks to cool completely.
- While cakes cool, make the frosting: Beat butter until creamy. Gradually add powdered sugar and cocoa, alternating with cream and vanilla, beating until smooth and spreadable.
- Level the cake layers with a serrated knife. Place one layer on a cake board, spread with 1/2 cup frosting, repeat.
- Apply a thin crumb coat to the entire cake. Refrigerate for 30 minutes.
- Apply the final coat of frosting, smoothing with an offset spatula or bench scraper.
- Decorate as desired. Let the cake sit at room temperature for at least 30 minutes before slicing.
Recipe: Chocolate Tiered Cake: Broke Pinterest
Ingredients
- 2 cups all-purpose flour (sifted)
- 2 cups sugar (granulated)
- 3/4 cup cocoa powder (unsweetened)
- 2 teaspoons baking soda
- 1 teaspoon baking powder
- 1 teaspoon salt
- 1 cup buttermilk (buttermilk, room temperature)
- 1/2 cup vegetable oil (vegetable oil)
- 2 large eggs (room temperature)
- 2 teaspoons vanilla extract
- 1 cup hot coffee (hot coffee)
- 1 1/2 cups unsalted butter (softened)
- 5 cups powdered sugar (sifted)
- 3/4 cup cocoa powder (unsweetened)
- 1/2 cup heavy cream (heavy cream, plus more if needed)
- 2 teaspoons vanilla extract
Instructions
- Preheat the oven to 350°F (175°C). Grease and flour three 8-inch round cake pans.
- In a large bowl, whisk together the flour, sugar, cocoa powder, baking soda, baking powder, and salt.
- Add the buttermilk, oil, eggs, and vanilla. Beat on medium speed for 2 minutes.
- Stir in the hot coffee until just combined (batter will be thin).
- Divide batter evenly among the pans. Bake 25-30 minutes, until a toothpick comes out clean.
- Cool in pans for 10 minutes, then turn out onto wire racks to cool completely.
- While cakes cool, make the frosting: Beat butter until creamy. Gradually add powdered sugar and cocoa, alternating with cream and vanilla, beating until smooth and spreadable.
- Level the cake layers with a serrated knife. Place one layer on a cake board, spread with 1/2 cup frosting, repeat.
- Apply a thin crumb coat to the entire cake. Refrigerate for 30 minutes.
- Apply the final coat of frosting, smoothing with an offset spatula or bench scraper.
- Decorate as desired. Let the cake sit at room temperature for at least 30 minutes before slicing.