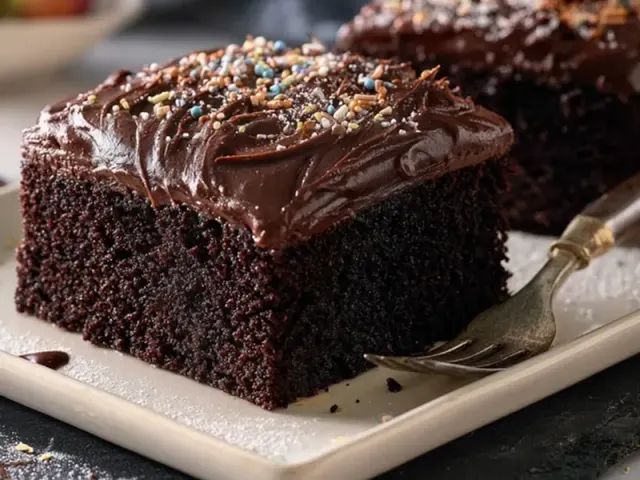
Chocolate Sheet Pan Cake: The Only Recipe You Need
The smell of chocolate cake drifting through pine trees is a kind of magic. It draws people from their tents, coffee cups in hand, asking what you’re making. This sheet pan cake is the one I turn to every time I need a dessert that feeds a crowd without fuss. No mixer. No multiple bowls. No waiting for layers to cool before frosting.

Here’s the trick that makes this different: you pour the frosting on while the cake is still warm. It sinks into the surface just slightly, creating a thin, glossy layer that crackles when you cut into it. No spreading required—just tilt the pan and let it find its own level.
Why a Sheet Pan Works for Camping
A rimmed baking sheet (10x15 inches is ideal) bakes the cake thin enough that it cooks through evenly without hot spots. That matters when you’re using a camp oven, a propane camp stove with an oven attachment, or even a Dutch oven with coals. The thin profile means less risk of a raw center or burnt edges. Plus, it cools faster—important when you’re serving outside and don’t want to wait an hour.
One thing I’ve learned: always bring the pan from home. Aluminum disposable pans work in a pinch, but they warp on the stove and don’t conduct heat as well. A standard half-sheet pan (18x13) works too—just double the recipe and watch the time, since a larger pan bakes faster.
The One-Bowl Method
Mix the dry ingredients right in the bowl you’ll use for everything. No sifting needed. The boiling water-butter-cocoa mixture does the work of dissolving the cocoa and sugar, so you get a smooth batter without lumps. Let that mixture cool for a minute before adding the eggs—otherwise you’ll end up with scrambled egg bits in your cake.
Buttermilk is worth the extra item in the cooler. It reacts with the baking soda to give the cake a tender crumb. No buttermilk? Add a tablespoon of lemon juice or white vinegar to regular milk and let it sit for five minutes. It’s not the same, but it works.
Baking at the Campsite
If you’re using a camp oven, preheat it fully before sliding the pan in. Camp ovens lose heat quickly when you open the door, so work fast. Place the pan on the middle rack. If your oven has a hot spot (most do), rotate the pan halfway through. A toothpick test is your friend—when it comes out clean or with a few moist crumbs, it’s done.
For a Dutch oven: use a trivet or a few clean pebbles at the bottom to lift the pan off the direct heat. Place about 8-10 coals underneath and 14-16 on top for a 12-inch oven. Check after 20 minutes. The cake won’t brown as much as in an oven, but the texture will be spot on.
Wind is the enemy of even baking. Set up your cooking area with a windbreak—a tarp, a vehicle, or a row of camp chairs. A gust can drop the temperature inside a camp oven by 50 degrees in seconds.
The Pour-and-Go Frosting
This frosting is where the technique matters. You want the cake to cool for exactly 15 minutes—no more, no less. Too hot and the frosting runs right off the edges. Too cool and it sets before you can spread it. Fifteen minutes leaves the cake warm enough to absorb the first thin layer of frosting, which locks in moisture.
Make the frosting while the cake cools. Bring the butter, cocoa, and milk to a gentle boil—don’t walk away, because milk burns fast. Remove from heat, whisk in the powdered sugar and vanilla, and pour immediately. Use a spatula to coax it to the corners if needed, but mostly just let gravity do the work.
Set the pan somewhere level. A picnic table that rocks will send all the frosting to one side. I’ve learned to carry a small level in the camp kitchen box for exactly this reason. Yes, it feels ridiculous. But a lopsided cake is sad cake.
Adapting for Weather and Kids
Hot day? Frost the cake in the shade or inside the car with the windows down. The frosting will set slower, but that’s fine—it just means a thinner final layer. If ants are a problem, set the pan on a larger tray with a moat of water around it. Works every time.
Camping with kids means they’ll want to help. Let them whisk the dry ingredients or pour the frosting. The batter is forgiving, and a few extra lumps won’t ruin it. Just keep little fingers away from the hot saucepan.
For a cold-weather campout, this cake is a morale booster. Serve it warm with a drizzle of the leftover frosting. The sugar will help keep everyone warm, and the chocolate hits that deep comfort note that cold air demands.
Storage and Leftovers
Cover the pan with foil and keep it in a cool spot. If you’re in bear country, store it in a bear canister or hung bag—sugar attracts animals just as much as meat does. The cake stays moist for two days, but it rarely lasts that long.
One last tip: cut the cake into squares while it’s still in the pan. Lift them out with a small spatula. No plates needed if you’re eating around the fire—just hand out squares on napkins. That’s the whole point of a sheet pan cake. It’s not fancy. It’s just exactly what you need.
Frequently Asked Questions
Can I make this cake ahead of time?
Yes. Bake the cake at home, cool it completely, and wrap it tightly. Frost it at the campsite or just before serving. It stays moist for up to two days.
How do I store leftovers?
Cover the pan with foil or a tight lid. Keep it in a cool spot out of direct sun. If it's hot, store it in a cooler (without ice touching the cake) or eat it within a few hours.
Can I use a different pan size?
Yes, but adjust time. A 9x13 pan works well; bake about 25-30 minutes. For a half-sheet (18x13), double the recipe and bake 20-25 minutes. Always test with a toothpick.
Chocolate Sheet Pan Cake: The Only Recipe You Need

A moist, one-bowl chocolate sheet pan cake that bakes evenly in any rimmed baking sheet. The frosting is poured on while the cake is still warm, creating a thin, crackly top that sets as it cools. Perfect for feeding a crowd at the campsite.
- 2 cups all-purpose flour
- 2 cups granulated sugar
- 1 teaspoon baking soda
- 1/2 teaspoon salt
- 1 cup water
- 1/2 cup unsalted butter
- 1/4 cup vegetable oil
- 1/4 cup unsweetened cocoa powder
- 1/2 cup buttermilk
- 2 large eggs
- 1 teaspoon vanilla extract
- 1/2 cup unsalted butter
- 1/4 cup unsweetened cocoa powder
- 1/3 cup whole milk
- 3 1/2 cups powdered sugar
- 1 teaspoon vanilla extract
- Preheat the oven to 375°F (190°C). Grease a 10x15-inch rimmed baking sheet (jelly roll pan) or line with parchment.
- In a large bowl, whisk together flour, sugar, baking soda, and salt.
- In a saucepan over medium heat, combine water, 1/2 cup butter, oil, and 1/4 cup cocoa. Bring to a boil, stirring occasionally. Remove from heat and pour over the dry ingredients. Stir until smooth.
- Add buttermilk, eggs, and vanilla. Mix until just combined. Pour batter into the prepared pan.
- Bake for 18-22 minutes, until a toothpick inserted in the center comes out clean. Let cool in the pan for 15 minutes.
- While the cake cools, make the frosting: In a saucepan, melt 1/2 cup butter with 1/4 cup cocoa and milk over medium heat, stirring constantly. Bring to a gentle boil, then remove from heat.
- Whisk in powdered sugar and vanilla until smooth. Pour over the warm cake and spread evenly. Let cool completely before slicing.
Recipe: Chocolate Sheet Pan Cake: The Only Recipe You Need
Ingredients
- 2 cups all-purpose flour
- 2 cups granulated sugar
- 1 teaspoon baking soda
- 1/2 teaspoon salt
- 1 cup water
- 1/2 cup unsalted butter
- 1/4 cup vegetable oil
- 1/4 cup unsweetened cocoa powder
- 1/2 cup buttermilk
- 2 large eggs
- 1 teaspoon vanilla extract
- 1/2 cup unsalted butter
- 1/4 cup unsweetened cocoa powder
- 1/3 cup whole milk
- 3 1/2 cups powdered sugar
- 1 teaspoon vanilla extract
Instructions
- Preheat the oven to 375°F (190°C). Grease a 10x15-inch rimmed baking sheet (jelly roll pan) or line with parchment.
- In a large bowl, whisk together flour, sugar, baking soda, and salt.
- In a saucepan over medium heat, combine water, 1/2 cup butter, oil, and 1/4 cup cocoa. Bring to a boil, stirring occasionally. Remove from heat and pour over the dry ingredients. Stir until smooth.
- Add buttermilk, eggs, and vanilla. Mix until just combined. Pour batter into the prepared pan.
- Bake for 18-22 minutes, until a toothpick inserted in the center comes out clean. Let cool in the pan for 15 minutes.
- While the cake cools, make the frosting: In a saucepan, melt 1/2 cup butter with 1/4 cup cocoa and milk over medium heat, stirring constantly. Bring to a gentle boil, then remove from heat.
- Whisk in powdered sugar and vanilla until smooth. Pour over the warm cake and spread evenly. Let cool completely before slicing.