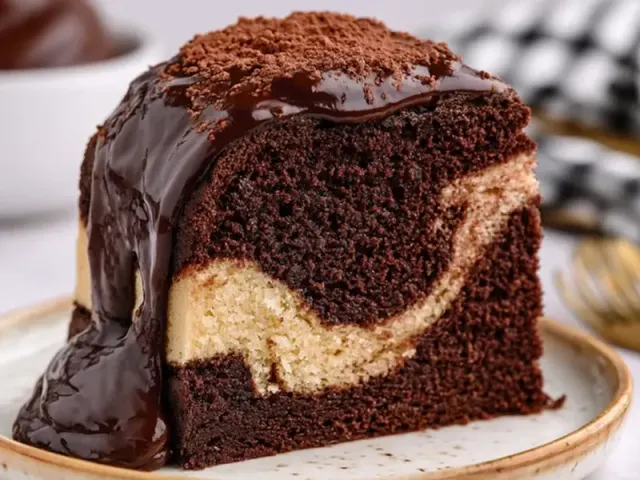
Chocolate Marble Cake: Bakery-Quality At Home
There's something about a chocolate marble cake that feels like a small victory. The way the dark and light batters weave together—never fully blending, never staying separate—creates a pattern that looks intentional and effortless at the same time. But getting that bakery-quality look at home? That takes a specific method, not just luck.

The Secret to Rich Chocolate Swirls
Most recipes call for cocoa powder in the chocolate portion, and that works fine for a mild flavor. But for a deeper, more pronounced chocolate taste, I use melted dark chocolate (60 to 70 percent cacao) combined with a tablespoon of cocoa powder. The melted chocolate adds fat and intensity, while the cocoa powder deepens the color. The result is a chocolate batter that stands out against the vanilla, both in flavor and in visual contrast.
Melt the chocolate gently—either in a double boiler or in short bursts in the microwave, stirring every 20 seconds. Let it cool for a few minutes before mixing it into the reserved vanilla batter. If the chocolate is too hot, it will thin the batter too much and make the swirls bleed.
The Right Batter Consistency Matters
Bakery-quality cake starts with the right crumb. For this recipe, the butter and sugar need to be creamed together until truly light and fluffy—about three minutes with a mixer on medium speed. The eggs should be at room temperature so they emulsify smoothly into the butter mixture. Cold eggs can cause the batter to look curdled, which affects the final texture.
Alternate adding the dry ingredients and the milk, starting and ending with the flour. This method builds structure without overworking the gluten. Stop mixing as soon as the last streak of flour disappears. An overmixed batter produces a dense, tough cake.
How to Marble Without Making a Mess
The number one mistake I see is over-swirling. It's tempting to keep turning the knife through the batter, but that just blends everything into a single muddy color. Here's the technique that works every time:
- Spread the vanilla batter evenly in the pan.
- Spoon the chocolate batter in dollops across the surface—about six to eight dollops for a standard loaf pan.
- Take a butter knife or a long skewer and insert it vertically into the batter. Make a gentle figure-eight motion, moving the knife through the pan just three or four times.
- Stop while you can still see distinct streaks of light and dark.
That's it. A light hand is the key to clean, bakery-style swirls.
Baking for the Perfect Doneness
Oven temperatures vary, so trust your senses more than the timer. At 350°F, a 9x5-inch loaf pan typically takes 45 to 50 minutes. Start checking at the 40-minute mark. Insert a toothpick into the center of the cake—if it comes out with a few moist crumbs clinging to it, the cake is done. If the toothpick is wet with batter, give it five more minutes and check again.
Let the cake rest in the pan for 15 minutes after baking. Then lift it out using the parchment sling and cool it completely on a wire rack before slicing. Cutting into a warm cake will cause the crumb to tear and the swirls to blur.
Why This Method Works
The combination of melted chocolate and cocoa powder creates a chocolate batter that is slightly thicker and heavier than the vanilla base. That density helps it sink into the vanilla batter just enough to form distinct ribbons without disappearing. The gentle swirling motion then pulls those ribbons into a pattern, not a blend.
This is the same approach used in professional bakeries, where consistency and appearance matter as much as taste. At home, it means you get a cake that looks impressive on the plate and tastes even better than it looks.
A Simple Takeaway
Chocolate marble cake doesn't have to be a gamble. Use melted chocolate for a richer swirl, keep the batter mixing minimal, and swirl with a light hand. Those three adjustments will take your cake from home-style to bakery-quality every time.
Frequently Asked Questions
Why did my marble cake turn out dry?
Overbaking is the most common cause. Check the cake five minutes before the suggested time—insert a toothpick into the center; if it comes out with a few moist crumbs, it's done. Also, ensure you measure flour correctly by spooning it into the cup and leveling off.
How do I get distinct swirls instead of a muddy mess?
The trick is to not over-swirl. After adding dollops of chocolate batter onto the vanilla base, use a knife to make just three or four figure-eight passes through the batter. Stop while you can still see separate streaks.
Can I use cocoa powder instead of melted chocolate?
Yes, but the texture will be slightly different. Substitute 3 tablespoons of unsweetened cocoa powder plus 2 tablespoons of melted butter for the 2 ounces of dark chocolate. Sift the cocoa with the flour to avoid lumps.
How should I store leftover marble cake?
Wrap the cooled cake tightly in plastic wrap and keep it at room temperature for up to three days. For longer storage, refrigerate in an airtight container for up to a week, or freeze slices wrapped in plastic and foil for up to three months.
Chocolate Marble Cake: Bakery-Quality At Home

This chocolate marble cake recipe delivers a tender, moist crumb with beautiful chocolate swirls. A simple technique—using melted chocolate for the dark batter instead of cocoa powder—creates a richer flavor and a more distinct marbled pattern.
- 1.5 cups all-purpose flour
- 1.5 teaspoons baking powder
- 0.25 teaspoon salt
- 0.5 cup unsalted butter (softened to room temperature)
- 1 cup granulated sugar
- 2 large eggs (room temperature)
- 1 teaspoon vanilla extract
- 0.5 cup whole milk (room temperature)
- 2 ounces dark chocolate (60-70%) (melted and slightly cooled)
- 1 tablespoon unsweetened cocoa powder
- Preheat your oven to 350°F (175°C). Grease a 9x5-inch loaf pan and line it with a strip of parchment paper that hangs over the long sides for easy lifting.
- In a medium bowl, whisk together the flour, baking powder, and salt.
- In a large bowl, beat the softened butter and granulated sugar with an electric mixer on medium speed until light and fluffy, about 3 minutes.
- Add the eggs one at a time, beating well after each addition. Stir in the vanilla extract.
- Add the dry ingredients in three additions, alternating with the milk, beginning and ending with the flour mixture. Mix just until combined—do not overmix.
- Scoop about one-third of the vanilla batter into a small bowl. Add the melted dark chocolate and cocoa powder, and stir until smooth. This is your chocolate batter.
- Spoon the remaining vanilla batter into the prepared pan, spreading it evenly. Drop spoonfuls of the chocolate batter on top, distributing them across the surface.
- Take a butter knife or skewer and gently swirl it through the batters in a figure-eight motion. Make only three or four passes—over-swirling will muddy the pattern.
- Bake for 45 to 50 minutes, or until a toothpick inserted in the center comes out with a few moist crumbs. Let the cake cool in the pan for 15 minutes, then lift it out using the parchment sling and transfer to a wire rack to cool completely.
- Slice and serve at room temperature. The marbled pattern will be most visible when the cake is fully cooled.
Recipe: Chocolate Marble Cake: Bakery-Quality At Home
Ingredients
- 1.5 cups all-purpose flour
- 1.5 teaspoons baking powder
- 0.25 teaspoon salt
- 0.5 cup unsalted butter (softened to room temperature)
- 1 cup granulated sugar
- 2 large eggs (room temperature)
- 1 teaspoon vanilla extract
- 0.5 cup whole milk (room temperature)
- 2 ounces dark chocolate (60-70%) (melted and slightly cooled)
- 1 tablespoon unsweetened cocoa powder
Instructions
- Preheat your oven to 350°F (175°C). Grease a 9x5-inch loaf pan and line it with a strip of parchment paper that hangs over the long sides for easy lifting.
- In a medium bowl, whisk together the flour, baking powder, and salt.
- In a large bowl, beat the softened butter and granulated sugar with an electric mixer on medium speed until light and fluffy, about 3 minutes.
- Add the eggs one at a time, beating well after each addition. Stir in the vanilla extract.
- Add the dry ingredients in three additions, alternating with the milk, beginning and ending with the flour mixture. Mix just until combined—do not overmix.
- Scoop about one-third of the vanilla batter into a small bowl. Add the melted dark chocolate and cocoa powder, and stir until smooth. This is your chocolate batter.
- Spoon the remaining vanilla batter into the prepared pan, spreading it evenly. Drop spoonfuls of the chocolate batter on top, distributing them across the surface.
- Take a butter knife or skewer and gently swirl it through the batters in a figure-eight motion. Make only three or four passes—over-swirling will muddy the pattern.
- Bake for 45 to 50 minutes, or until a toothpick inserted in the center comes out with a few moist crumbs. Let the cake cool in the pan for 15 minutes, then lift it out using the parchment sling and transfer to a wire rack to cool completely.
- Slice and serve at room temperature. The marbled pattern will be most visible when the cake is fully cooled.