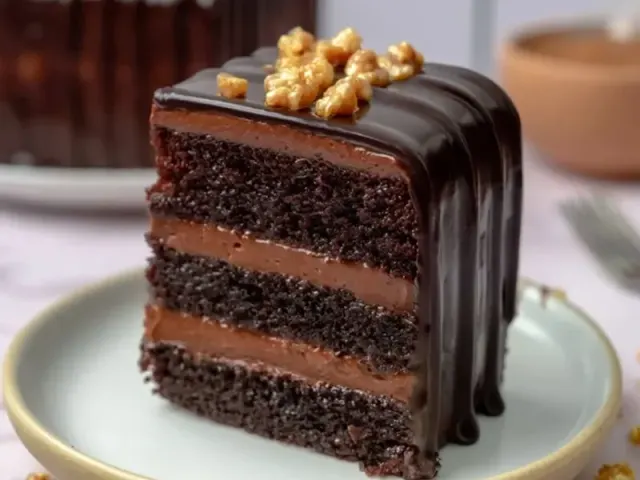
Chocolate Layer Cake at Camp: No-Bake, No-Fuss
The first time I tried to make a chocolate layer cake at camp, I ended up with a lopsided mess and a melted frosting puddle. The second time, I got smart. A no-bake approach that uses stable ganache and pre-made layers means you get that rich, indulgent cake without the oven, the stress, or the cleanup. Here's how to pull it off so everyone at the campsite is genuinely impressed.

Why No-Bake Works for Tent Camping
Baking a layer cake over a camp stove or in a Dutch oven takes serious skill and patience. You need consistent heat, a way to check doneness without opening the lid too often, and enough fuel. For most of us, the result is uneven layers and a burnt bottom. A no-bake cake, on the other hand, uses layers you bake at home (or buy) and a frosting that sets firm without refrigeration. This technique saves time, fuel, and frustration — and it tastes just as good.
The Secret to a Stable Frosting
Buttercream wilts in warm weather. Whipped cream collapses. The frosting that works best for camp is a dark chocolate ganache made with a 2:1 ratio of chocolate to cream. That extra chocolate makes it thick and fudge-like once cooled. It doesn't need constant refrigeration to stay firm, though I still keep it in the cooler during transport. For a lighter texture, whip the cooled ganache with a hand whisk until it lightens in color and becomes spreadable — about 2 minutes of vigorous stirring.
Common Mistake: Overheating the Cream
If the cream boils, it can scorch the chocolate. Heat it only until small bubbles form around the edges — never a full rolling boil. Pour it over the chopped chocolate and let it sit undisturbed for two minutes before stirring. This gentle approach gives you a silky, glossy ganache every time.
Picking the Right Cake Layers
Homemade layers are great if you have the time. Bake them a day ahead, let them cool completely, and wrap each layer tightly in plastic wrap. Store-bought layers work just as well — look for dense, moist chocolate cake, not the airy kind that crumbles. At camp, unwrap the layers and let them sit for 10 minutes to come to room temperature. Cold cake layers can cause the frosting to seize and become grainy.
Assembly at Camp: Step by Step
You'll need a flat surface — a picnic table or a clean camp table works. Place the first layer on a sturdy plate or inside a lidded container (the container lid itself can double as a base). Spread a generous layer of ganache frosting on top, about 1/4 inch thick. If you want an extra flavor boost, add a thin layer of raspberry jam or chocolate spread before the frosting. Place the second layer on top, then frost the entire cake — top and sides. A small offset spatula or even a butter knife works fine.
Setting and Serving in the Outdoors
Let the cake sit at ambient temperature for 30 minutes so the ganache firms up. If it's a hot day (above 80°F), place the cake in the cooler for 15 minutes instead. Slice with a sharp knife, wiping the blade clean between cuts. Serve on small plates or napkins. The cake stays good in a sealed container in the cooler for up to two days, though I doubt it'll last that long.
Safety Note: Keep Cooler Food Separate
Store the cake in its own container, away from raw meat or fish. Use a separate cooler for drinks and perishable foods if possible. If you're in bear country, follow local food storage regulations — store all food, including the cake, in a bear-resistant container or hung properly at night.
Adapting for Weather and Conditions
In cool weather (below 60°F), the ganache will set quickly. You might need to let it soften at room temperature for 10 minutes before spreading. In humid conditions, condensation can form on the cake surface. Pat it gently with a paper towel before serving. If rain threatens, assemble the cake under a tarp or inside the tent vestibule — keep it covered until serving.
The Takeaway
A chocolate layer cake at camp isn't a pipe dream. With pre-made layers and a stable ganache frosting, you can serve a dessert that looks and tastes like it came from a bakery. No oven, no meltdowns, no fuss. Just good cake in the middle of nowhere.
Frequently Asked Questions
Can I bake a chocolate layer cake at camp?
Yes, but it's tricky. A Dutch oven or camp stove can bake cake layers, but you need precise heat control and extra fuel. For most campers, a no-bake version using pre-baked layers or store-bought cake is more reliable and saves time.
How do I keep chocolate layer cake from melting in hot weather?
Use a stable frosting like ganache or cream cheese-based, not buttercream. Store the cake in a cooler with a frozen ice pack, wrapped in a towel to prevent condensation. Serve in the shade or early morning when temps are lower.
What's the best container to transport a chocolate layer cake camping?
A lidded plastic container with a tight seal works best. For extra stability, place a non-slip mat or paper towel under the cake plate. Avoid glass—it's heavy and can break on rough trails.
Chocolate Layer Cake at Camp: No-Bake, No-Fuss

A no-bake chocolate layer cake built from pre-made or baked-at-home layers, assembled at camp with a stable ganache-style frosting. Perfect for a celebratory dessert in the woods.
- 2 cups heavy cream
- 1 lb dark chocolate (60-70% cacao), finely chopped
- 2 tablespoons unsalted butter, softened
- 1 teaspoon vanilla extract
- 2 pre-baked 8-inch chocolate cake layers (homemade or store-bought) (cooled completely)
- 1/2 cup raspberry jam or chocolate spread (optional, for filling)
- At home: Place chopped chocolate in a heatproof bowl. Heat heavy cream in a saucepan until just simmering (small bubbles around edge). Pour hot cream over chocolate, let sit 2 minutes, then stir until smooth. Stir in butter and vanilla. Let cool to room temperature, then refrigerate 2 hours until spreadable.
- At camp: If frosting is too firm, let it sit at room temperature for 15 minutes. Place one cake layer on a flat plate or container lid. Spread with half the frosting (and jam if using). Top with second layer. Frost top and sides with remaining frosting.
- Let cake rest 30 minutes at camp temperature (or 15 minutes in a cooler) to set. Slice and serve. Store leftovers in a sealed container in the cooler for up to 2 days.
Recipe: Chocolate Layer Cake at Camp: No-Bake, No-Fuss
Ingredients
- 2 cups heavy cream
- 1 lb dark chocolate (60-70% cacao), finely chopped
- 2 tablespoons unsalted butter, softened
- 1 teaspoon vanilla extract
- 2 pre-baked 8-inch chocolate cake layers (homemade or store-bought) (cooled completely)
- 1/2 cup raspberry jam or chocolate spread (optional, for filling)
Instructions
- At home: Place chopped chocolate in a heatproof bowl. Heat heavy cream in a saucepan until just simmering (small bubbles around edge). Pour hot cream over chocolate, let sit 2 minutes, then stir until smooth. Stir in butter and vanilla. Let cool to room temperature, then refrigerate 2 hours until spreadable.
- At camp: If frosting is too firm, let it sit at room temperature for 15 minutes. Place one cake layer on a flat plate or container lid. Spread with half the frosting (and jam if using). Top with second layer. Frost top and sides with remaining frosting.
- Let cake rest 30 minutes at camp temperature (or 15 minutes in a cooler) to set. Slice and serve. Store leftovers in a sealed container in the cooler for up to 2 days.