Chocolate Crepes: The Camp Stove Method You Need
The first time I tried making chocolate crepes on a camp stove, I ended up with a blackened, rubbery disc that tasted like burnt regret. I had the heat cranked high, the batter was lumpy, and I flipped it too early. A mess. But after a few more attempts—and a lot of patience—I figured out the method. And honestly, the camp stove is an ideal tool for crepes. You just need to know the tricks.

The Batter Secret: Rest It
Most people mix the batter and immediately pour it into the pan. That is the number one mistake. The gluten in the flour needs time to relax. If you cook it right away, the crepe will be tough and chewy, not tender and delicate. After you whisk everything together—flour, cocoa powder, sugar, salt, eggs, milk, melted butter, and vanilla—let it sit for at least 15 minutes. Cover the bowl with a plate or a clean bandana. During that time, the bubbles settle and the batter thickens slightly. You will notice the difference in texture immediately. While it rests, you can set up your camp stove and get your fillings ready.
Heat Control: Low and Slow Wins
The second common mistake is treating a crepe like a pancake. Pancakes take medium-high heat. Crepes need medium-low. On a camp stove, which can be finicky, this is even more important. If the flame is too high, the outside burns before the inside sets, and you get a stiff, dark crepe that cracks when you fold it. Set your burner to a low flame. Let the pan heat for a full two minutes. A drop of water should sizzle gently, not dance and evaporate instantly. Use a non-stick pan—I prefer a 10-inch one—and add a small pat of butter. Swirl it until it melts and coats the bottom. The butter should foam but not brown.
The Pour and Swirl Technique
Pour about a quarter cup of batter into the center of the pan. Immediately lift the pan and tilt it in a circular motion so the batter spreads into a thin, even layer that reaches the edges. This takes practice. The first crepe is often a test. If it's too thick, add a splash of milk to the batter. If it tears, your pan might be too hot or you didn't use enough butter. Once the batter is in the pan, don't touch it. Let it cook undisturbed for 1 to 2 minutes. You will see the edges start to lift away from the pan, and the surface will look matte instead of glossy. That is your cue to flip.
Flipping Without Fear
Slide a thin, flexible spatula under the crepe. Lift it gently. If it sticks, give it another 15 seconds. Flip quickly but carefully. The second side only needs 30 to 45 seconds. You are not trying to brown it—just set it. Slide the finished crepe onto a plate. Stack them with a clean kitchen towel or a pot lid on top to keep them warm and soft. Do not leave them in the pan or they will dry out.
The Chocolate Filling: Keep It Simple
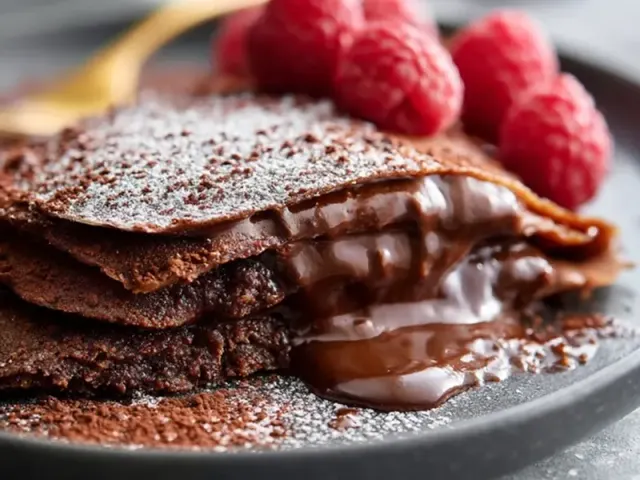
For the filling, I use a chocolate hazelnut spread. It melts slightly from the warmth of the crepe, creating a luscious, gooey center. Spread a thin line down the middle, then fold the crepe in half, then in half again, or roll it into a log. If you want a more intense chocolate hit, sprinkle a few chocolate chips along with the spread. Sliced almonds or a dusting of powdered sugar add a nice crunch and finish. But the crepe itself should be the star—not overloaded with fillings. A thin layer is enough.
Adapting for Wind and Weather
Wind is the enemy of even heat on a camp stove. Set up your stove in a sheltered spot—behind a large rock, a cooler, or your vehicle. Use a windscreen if your stove allows it, but be careful not to block oxygen flow. If it's cold, the batter will thicken; add a tablespoon of milk to keep it pourable. If it's hot and humid, the crepes may cook faster, so keep an eye on the first one. And always store your chocolate spread in a sealed container—sweet smells attract ants and other critters. Clean up immediately after cooking.
A Note on Safety
Cook on a stable, level surface away from tent walls and dry grass. Keep a small fire extinguisher or a pot of water nearby. Never leave the stove unattended. And after you finish, make sure the stove is completely cool before packing it away. The last thing you want is a hot stove singeing your gear.
The Takeaway
Chocolate crepes from a camp stove can be just as good as anything from a home kitchen—better, actually, because you are eating them outside, with the smell of pine and the sound of wind in the trees. The key is resting the batter, controlling the heat, and being patient with the first crepe. Once you get the rhythm, it becomes a satisfying ritual. Try it on your next trip. You will never go back to instant oatmeal.
Frequently Asked Questions
Can I make the crepe batter ahead of time?
Yes, you can mix the dry ingredients at home and add the wet ingredients at camp. Or make the full batter the night before and store it in a sealed container in a cooler. Give it a good stir before using.
What if I don't have a non-stick pan?
You can use a well-seasoned cast iron skillet. Make sure it's hot, add a little more butter, and wipe the pan with oil between crepes. The first crepe is often a test one.
How do I keep crepes warm while cooking the rest?
Stack them on a plate and cover with a clean kitchen towel or a pot lid. The residual heat keeps them soft. Don't leave them in the pan or they'll dry out.
Can I use a different filling?
Absolutely. Try sliced bananas, strawberries, or a sprinkle of cinnamon sugar. For a savory twist, add ham and cheese. Just make sure any filling is camp-safe and doesn't require refrigeration.
What's the biggest mistake people make?
Cooking the crepe on too high heat. The outside burns before the inside sets, and you get a tough, rubbery crepe. Low to medium heat is key. Also, not letting the batter rest for at least 15 minutes leads to a gummy texture.
Chocolate Crepes: The Camp Stove Method You Need

Light, tender chocolate crepes cooked over a camp stove. The secret is resting the batter and using low, even heat for a perfect golden-brown finish every time.
- 1 cup all-purpose flour
- 2 tablespoons cocoa powder (unsweetened)
- 2 tablespoons granulated sugar
- 1/4 teaspoon salt
- 2 large eggs
- 1 1/4 cups whole milk
- 3 tablespoons unsalted butter (melted, plus more for the pan)
- 1 teaspoon vanilla extract
- 1/2 cup chocolate hazelnut spread (or chocolate chips, for filling)
- 1/4 cup sliced almonds (optional, for topping)
- In a medium bowl, whisk together the flour, cocoa powder, sugar, and salt.
- In a separate bowl, beat the eggs, then whisk in the milk, melted butter, and vanilla.
- Pour the wet ingredients into the dry ingredients and whisk until smooth. The batter should be thin, like heavy cream. If it's too thick, add a tablespoon more milk.
- Let the batter rest for 15 minutes. This relaxes the gluten and gives you a tender crepe.
- Heat a 10-inch non-stick pan over medium-low heat on your camp stove. Add a small pat of butter and swirl to coat.
- Pour about 1/4 cup of batter into the center of the pan. Immediately tilt and swirl the pan so the batter covers the bottom in a thin, even layer.
- Cook for 1 to 2 minutes, until the edges start to lift and the surface looks set. The bottom should be lightly golden.
- Flip the crepe using a thin spatula. Cook for another 30 to 45 seconds on the second side.
- Slide the crepe onto a plate. Spread a thin layer of chocolate hazelnut spread down the center, then fold or roll the crepe.
- Repeat with the remaining batter, stacking finished crepes under a towel to keep warm. Serve warm, topped with almonds if desired.
Recipe: Chocolate Crepes: The Camp Stove Method You Need
Ingredients
- 1 cup all-purpose flour
- 2 tablespoons cocoa powder (unsweetened)
- 2 tablespoons granulated sugar
- 1/4 teaspoon salt
- 2 large eggs
- 1 1/4 cups whole milk
- 3 tablespoons unsalted butter (melted, plus more for the pan)
- 1 teaspoon vanilla extract
- 1/2 cup chocolate hazelnut spread (or chocolate chips, for filling)
- 1/4 cup sliced almonds (optional, for topping)
Instructions
- In a medium bowl, whisk together the flour, cocoa powder, sugar, and salt.
- In a separate bowl, beat the eggs, then whisk in the milk, melted butter, and vanilla.
- Pour the wet ingredients into the dry ingredients and whisk until smooth. The batter should be thin, like heavy cream. If it's too thick, add a tablespoon more milk.
- Let the batter rest for 15 minutes. This relaxes the gluten and gives you a tender crepe.
- Heat a 10-inch non-stick pan over medium-low heat on your camp stove. Add a small pat of butter and swirl to coat.
- Pour about 1/4 cup of batter into the center of the pan. Immediately tilt and swirl the pan so the batter covers the bottom in a thin, even layer.
- Cook for 1 to 2 minutes, until the edges start to lift and the surface looks set. The bottom should be lightly golden.
- Flip the crepe using a thin spatula. Cook for another 30 to 45 seconds on the second side.
- Slide the crepe onto a plate. Spread a thin layer of chocolate hazelnut spread down the center, then fold or roll the crepe.
- Repeat with the remaining batter, stacking finished crepes under a towel to keep warm. Serve warm, topped with almonds if desired.