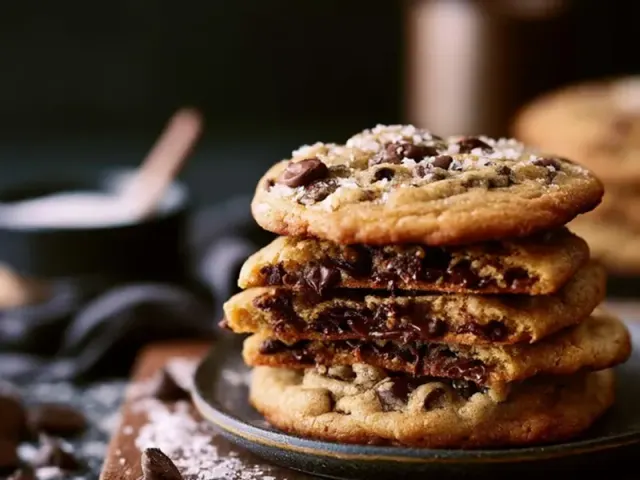
Chocolate Chip Christmas Cookies: Bakery-Quality At Home
There's nothing quite like the smell of butter and sugar melting together in a warm kitchen, especially when the holiday season rolls around. The first batch of chocolate chip Christmas cookies coming out of the oven feels like a small celebration. But getting that bakery-quality texture—crisp edges, chewy centers, and deep caramelized flavor—takes a few deliberate techniques. I've baked hundreds of batches, and these are the methods that consistently deliver.

Brown the Butter for Depth
Browning the butter is the single most impactful step you can take. It adds a nutty, toffee-like richness that elevates the entire cookie. Melt your butter in a light-colored saucepan over medium heat. Swirl it gently as it foams and watch for the milk solids to turn golden amber. The moment you smell that toasted aroma, pull it off the heat and pour it into a mixing bowl to stop the cooking. Let it cool for five minutes before adding sugars. This step adds complexity you simply cannot get from melted butter alone.
The Sugar Ratio Matters
For that classic chewy texture, use more brown sugar than white. Brown sugar contains molasses, which retains moisture and creates a softer crumb. I use a heaping cup of packed brown sugar to half a cup of granulated. This ratio gives the cookies a subtle caramel undertone and keeps them tender for days. If you want slightly crisper cookies, flip the ratio—but for holiday indulgence, stick with the brown sugar majority.
Chill the Dough—No Skipping
Chilling the dough is non-negotiable for bakery-quality results. At least 30 minutes in the fridge allows the fats to solidify, which prevents the cookies from spreading too thin in the oven. It also gives the flour time to hydrate, developing a more complex flavor. I often make the dough a day ahead and let it rest overnight. The difference in texture is remarkable: thicker, more uniform cookies with a satisfying chew. If you're in a hurry, even 20 minutes in the freezer works, but don't skip it entirely.
Portioning and Placement
Use a cookie scoop for even sizing—about 1.5 tablespoons each. Place them two inches apart on a parchment-lined baking sheet. Parchment is essential; it provides a non-stick surface and promotes even browning without burning the bottoms. For that bakery look, press a few extra chocolate chips onto the tops of each dough ball before baking. This ensures visible chocolate in every bite, not just hidden inside.
Baking Temperature and Timing
Preheat your oven to 375°F (190°C) and bake one sheet at a time. Overcrowding the oven leads to uneven heat and flat cookies. Rotate the pan halfway through for consistent browning. The key visual cue: pull the cookies when the edges are set and golden, but the centers still look slightly underdone and puffy. They will continue baking from residual heat on the hot sheet. Let them rest on the pan for exactly five minutes before transferring to a wire rack. This sets the structure without drying them out.
Finishing Touch: Flaky Sea Salt
A light sprinkle of flaky sea salt right after baking transforms these cookies. The salt cuts through the sweetness, intensifies the chocolate flavor, and mimics that professional bakery finish. Use a high-quality sea salt like Maldon—just a pinch per cookie. It's a small detail that makes a huge difference in taste and presentation.
Storage for Freshness
Store baked cookies in an airtight container at room temperature with a slice of bread. The bread absorbs excess moisture and keeps the cookies soft. They'll stay fresh for up to a week, though they rarely last that long. For longer storage, freeze the unbaked dough balls on a baking sheet, then transfer to a freezer bag. Bake directly from frozen, adding one to two minutes to the baking time. This way, you can have warm, bakery-quality cookies anytime during the holiday season.
The real joy of these cookies is sharing them. Whether you're packing them for a holiday camping trip or leaving a plate for neighbors, the effort you put into technique shows in every bite. A little patience with the butter, the chill time, and the baking cues pays off in cookies that taste like they came from a professional bakery—made right in your own kitchen.
Frequently Asked Questions
Why do my chocolate chip cookies turn out flat?
Flat cookies usually mean the butter was too soft or melted, or the dough wasn't chilled. For bakery-style thickness, chill the dough for at least 30 minutes. Also ensure your baking soda is fresh—test by dropping a pinch into vinegar; it should fizz vigorously.
Can I use different chocolate for Christmas cookies?
Absolutely. Swap semi-sweet chips for dark chocolate chunks, white chocolate, or even chopped candy canes for a festive twist. Keep the total weight of chocolate similar to maintain dough consistency.
How do I get chewy centers with crispy edges?
The key is a higher brown sugar to white sugar ratio—brown sugar adds moisture for chewiness. Also, remove cookies from the oven when the edges are golden but centers still look slightly underdone. They continue baking on the hot sheet.
What's the best way to store Christmas cookies?
Store in an airtight container at room temperature with a slice of bread to maintain softness. For longer storage, freeze baked cookies in a single layer, then transfer to a freezer bag. They keep for up to 3 months.
Chocolate Chip Christmas Cookies: Bakery-Quality At Home

These chocolate chip Christmas cookies deliver bakery-quality results with a perfect balance of chewy centers and crisp edges. The secret is browning the butter and chilling the dough for deep flavor and ideal texture.
- 1 cup unsalted butter
- 1 1/4 cups brown sugar, packed
- 1/2 cup granulated sugar
- 2 large eggs (room temperature)
- 2 teaspoons vanilla extract
- 2 1/4 cups all-purpose flour
- 1 teaspoon baking soda
- 1/2 teaspoon salt
- 2 cups semi-sweet chocolate chips (or chopped chocolate chunks)
- flaky sea salt for sprinkling
- Brown the butter: In a small saucepan over medium heat, melt the butter. Swirl occasionally until it turns golden brown and smells nutty, about 5–7 minutes. Pour into a large bowl and let cool slightly.
- Add both sugars to the warm butter and whisk until combined. Let cool for 5 minutes.
- Whisk in the eggs one at a time, then the vanilla extract, until smooth.
- In a separate bowl, whisk together the flour, baking soda, and salt. Gradually fold the dry ingredients into the wet mixture until just combined—do not overmix.
- Fold in the chocolate chips until evenly distributed. Cover the dough and refrigerate for at least 30 minutes (or up to 72 hours for deeper flavor).
- Preheat the oven to 375°F (190°C). Line two baking sheets with parchment paper.
- Scoop rounded tablespoons of dough (about 1.5 ounces each) and place 2 inches apart on the prepared sheets. Sprinkle each dough ball with a pinch of flaky sea salt.
- Bake one sheet at a time for 10–12 minutes, until the edges are golden and the centers look slightly puffy and underdone. Rotate the pan halfway through.
- Let the cookies cool on the baking sheet for 5 minutes, then transfer to a wire rack to cool completely.
Recipe: Chocolate Chip Christmas Cookies: Bakery-Quality At Home
Ingredients
- 1 cup unsalted butter
- 1 1/4 cups brown sugar, packed
- 1/2 cup granulated sugar
- 2 large eggs (room temperature)
- 2 teaspoons vanilla extract
- 2 1/4 cups all-purpose flour
- 1 teaspoon baking soda
- 1/2 teaspoon salt
- 2 cups semi-sweet chocolate chips (or chopped chocolate chunks)
- flaky sea salt for sprinkling
Instructions
- Brown the butter: In a small saucepan over medium heat, melt the butter. Swirl occasionally until it turns golden brown and smells nutty, about 5–7 minutes. Pour into a large bowl and let cool slightly.
- Add both sugars to the warm butter and whisk until combined. Let cool for 5 minutes.
- Whisk in the eggs one at a time, then the vanilla extract, until smooth.
- In a separate bowl, whisk together the flour, baking soda, and salt. Gradually fold the dry ingredients into the wet mixture until just combined—do not overmix.
- Fold in the chocolate chips until evenly distributed. Cover the dough and refrigerate for at least 30 minutes (or up to 72 hours for deeper flavor).
- Preheat the oven to 375°F (190°C). Line two baking sheets with parchment paper.
- Scoop rounded tablespoons of dough (about 1.5 ounces each) and place 2 inches apart on the prepared sheets. Sprinkle each dough ball with a pinch of flaky sea salt.
- Bake one sheet at a time for 10–12 minutes, until the edges are golden and the centers look slightly puffy and underdone. Rotate the pan halfway through.
- Let the cookies cool on the baking sheet for 5 minutes, then transfer to a wire rack to cool completely.