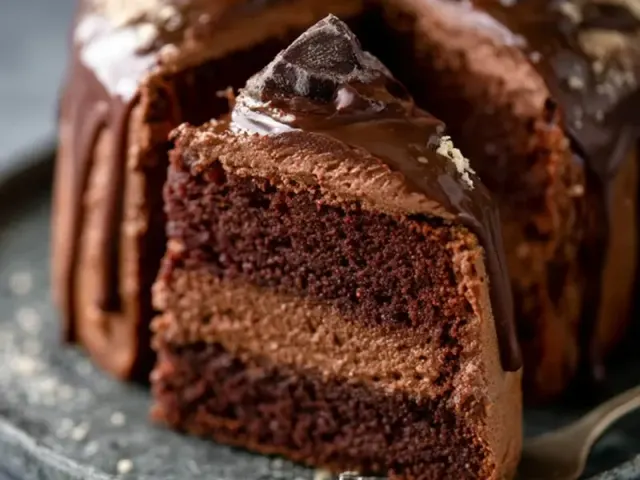
Chocolate Bundt Cake on Your Camp Stove: A Game Changer
The first time I pulled a chocolate Bundt cake out of a Dutch oven on a camp stove, I knew something had shifted. The smell alone—deep cocoa, warm butter, a hint of caramelized sugar—cut through the pine air and drew everyone from their tents. It was rich, moist, and had that unmistakable crackly top that gives way to a tender crumb. No campfire ash, no burnt edges, no soggy middle. Just a proper cake, baked right there on a two-burner stove.

This isn’t about elaborate camp kitchen setups or hauling a portable oven. It’s about a single technique that changes what’s possible when you’re tent camping. The trick is a water bath inside a standard 12-inch Dutch oven, combined with a Bundt pan. The water creates steam, which keeps the cake from drying out and prevents the bottom from scorching. The Bundt pan’s central tube ensures even heat penetration. Together, they deliver a dessert that rivals anything from a home kitchen.
Why a Bundt Pan Works Better Than a Skillet
A cast iron skillet is a workhorse, I use it for everything from eggs to cobblers. But for a cake, the skillet’s wide, shallow shape means the center cooks faster than the edges, and the bottom often darkens too much. A Bundt pan solves both problems. The central tube allows heat to reach the middle of the batter, so the cake bakes evenly from the inside out. The fluted sides create more surface area for that lovely golden crust, and the pan’s depth means the batter sits higher above the heat source.
The common mistake is to place the Bundt pan directly on the bottom of the Dutch oven. Don’t. That guarantees a burnt bottom. Instead, use a trivet or an inverted heat-safe bowl to lift the pan above the water. The water level should be about an inch deep, and it should never touch the pan. The steam does the work.
Setting Up the Stove for Success
Heat control on a camp stove is different from a home oven. The flame is more direct, and there’s no thermostat. I use a medium-low flame and keep the Dutch oven lid on the entire time. Every ten minutes, I rotate the whole Dutch oven a quarter turn. This prevents hot spots from the burner. If your stove has two burners, you can also shift the Dutch oven to the other burner halfway through for more even heat.
A note on wind: even a light breeze can steal heat from the burner. Set up a windbreak—a folding screen, a cooler placed on its side, or even a large rock. The goal is a steady, undisturbed flame.
The Water Pan Method, Step by Step
This is the heart of the technique. The water pan is not a separate pan—it’s the space inside the Dutch oven below the trivet. Here’s the exact sequence:
First, grease the Bundt pan thoroughly with butter or oil, then dust with cocoa powder or flour. Cocoa powder is better—it won’t leave white streaks on the finished cake. Pour in the batter (box mix or from scratch, both work).
Place a trivet or a small, heat-safe bowl upside down in the bottom of the Dutch oven. Pour in about two cups of water—enough to cover the bottom by about an inch. Set the Bundt pan on the trivet. The water should not touch the pan. Put the lid on.
Heat over medium-low for 40 to 50 minutes. Check at 40 minutes by inserting a skewer into the center. If it comes out clean, it’s done. If not, give it five more minutes and check again. Let the cake cool in the pan for ten minutes before inverting onto a plate.
Adapting for Rain or Cold
Rain changes everything. If it’s drizzling, set up your stove under the vestibule of your tent or a tarp. Keep the Dutch oven lid dry—water dripping on the lid can cause temperature fluctuations. In cold weather (below 50°F), the stove will need a slightly higher flame to maintain heat. Add five minutes to the cooking time and check earlier.
The One Trick That Makes the Difference
Here’s the specific angle you won’t find on other sites: use a metal measuring cup or a small ramekin as a second heat diffuser. Place it upside down on the trivet, then set the Bundt pan on top of that. This lifts the pan another half inch above the water and adds an extra layer of insulation between the pan and the burner. It takes a little more care to balance the pan, but the result is a cake with no burnt bottom at all—just an even, tender crumb from top to bottom.
I learned this after a few scorched attempts. The direct heat from the burner can still travel up through the trivet. That extra half inch of air gap stops it cold.
Safety Notes
Baking on a camp stove means managing hot metal. The Dutch oven handles and lid will be dangerously hot. Use heavy oven mitts, not thin gloves. Keep the stove area clear of flammable items—paper towels, dry leaves, tent fabric. When you lift the lid, tilt it away from you to avoid a steam burn. And never leave the stove unattended while baking.
For food storage: any leftover cake should be wrapped tightly and stored in a bear-proof container or hung from a tree if you’re in bear country. The sweet smell attracts wildlife.
The Takeaway
A chocolate Bundt cake from a camp stove is not a novelty. It’s a technique that expands what you can do with simple gear. The water pan method, the trivet lift, the quarter-turn rotation—these are small adjustments that deliver a reliable result. Once you’ve done it, you’ll start thinking about what else you can bake out here. And that’s when the real change happens.
Frequently Asked Questions
Can I use a boxed mix for this chocolate Bundt cake?
Yes, absolutely. A boxed chocolate cake mix works fine. Just follow the mix instructions for ingredients (eggs, oil, water) and use the same camp stove method. The key is low, even heat and the water pan trick.
What if I don’t have a Bundt pan?
You can use a standard 10-inch Dutch oven as the baking vessel. The cake won’t have the Bundt shape, but it will still bake evenly. Grease the bottom well. Alternatively, use a 9-inch round metal cake pan that fits inside your Dutch oven.
How do I prevent the cake from burning on the bottom?
Use a heat diffuser or a second trivet under the Dutch oven. Rotate the oven a quarter turn every 10 minutes. The water pan method described in the post is the most reliable way to protect the bottom from scorching.
Chocolate Bundt Cake on Your Camp Stove: A Game Changer

A moist, rich chocolate Bundt cake baked entirely on a camp stove using a Dutch oven and a clever water bath trick. No oven required, and the result is a showstopper dessert for any tent camping trip.
- 1 box chocolate cake mix (standard 15.25 oz) (plus ingredients called for on box: eggs, oil, water)
- 1 cup semi-sweet chocolate chips (optional but recommended)
- 2 tablespoons unsalted butter (for greasing the Bundt pan)
- 1 tablespoon cocoa powder (for dusting the Bundt pan)
- 2 cups water (for the water pan in the Dutch oven)
- Prepare the cake batter according to the box directions. Fold in chocolate chips if using.
- Generously grease a 10-inch Bundt pan with butter, then dust with cocoa powder. Tap out excess.
- Pour batter into the prepared Bundt pan, spreading evenly.
- Place a metal trivet or a small heat-safe bowl upside down in the bottom of a 12-inch Dutch oven. This creates a platform.
- Pour 2 cups of water into the Dutch oven, below the trivet. The water will create steam and prevent burning.
- Carefully set the Bundt pan on the trivet. The water should not touch the pan.
- Place the Dutch oven lid on. Set the Dutch oven on a camp stove burner over medium-low heat.
- After 10 minutes, rotate the Dutch oven a quarter turn to ensure even heat. Repeat every 10 minutes.
- Bake for 40-50 minutes total. Test doneness by inserting a skewer into the center of the cake; it should come out clean or with a few moist crumbs.
- Carefully remove the hot Bundt pan from the Dutch oven using oven mitts. Let cool on a rack for 10 minutes before inverting onto a plate.
- Optional: dust with powdered sugar or drizzle with a simple glaze (1 cup powdered sugar + 2 tablespoons milk) after cooling.
Recipe: Chocolate Bundt Cake on Your Camp Stove: A Game Changer
Ingredients
- 1 box chocolate cake mix (standard 15.25 oz) (plus ingredients called for on box: eggs, oil, water)
- 1 cup semi-sweet chocolate chips (optional but recommended)
- 2 tablespoons unsalted butter (for greasing the Bundt pan)
- 1 tablespoon cocoa powder (for dusting the Bundt pan)
- 2 cups water (for the water pan in the Dutch oven)
Instructions
- Prepare the cake batter according to the box directions. Fold in chocolate chips if using.
- Generously grease a 10-inch Bundt pan with butter, then dust with cocoa powder. Tap out excess.
- Pour batter into the prepared Bundt pan, spreading evenly.
- Place a metal trivet or a small heat-safe bowl upside down in the bottom of a 12-inch Dutch oven. This creates a platform.
- Pour 2 cups of water into the Dutch oven, below the trivet. The water will create steam and prevent burning.
- Carefully set the Bundt pan on the trivet. The water should not touch the pan.
- Place the Dutch oven lid on. Set the Dutch oven on a camp stove burner over medium-low heat.
- After 10 minutes, rotate the Dutch oven a quarter turn to ensure even heat. Repeat every 10 minutes.
- Bake for 40-50 minutes total. Test doneness by inserting a skewer into the center of the cake; it should come out clean or with a few moist crumbs.
- Carefully remove the hot Bundt pan from the Dutch oven using oven mitts. Let cool on a rack for 10 minutes before inverting onto a plate.
- Optional: dust with powdered sugar or drizzle with a simple glaze (1 cup powdered sugar + 2 tablespoons milk) after cooling.