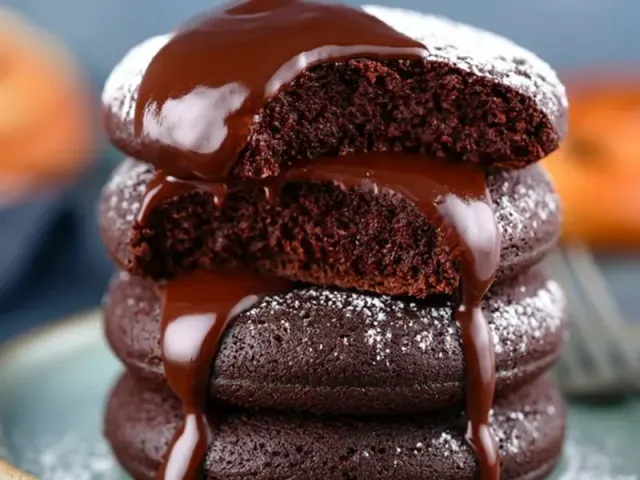
Bakery-Quality Chocolate Donuts at Home
The smell of chocolate donuts fresh from the oven — or the pan — is one of those things that can turn a gray morning around. I've spent more time than I'd like to admit trying to replicate that bakery-style crunch and tender crumb at home. After many batches, I landed on a method that works every time. The trick is twofold: a buttermilk base for tenderness and a hot cooking surface (oven or oil) that sets the crust fast. Here's how to get there without a deep fryer or a pastry degree.

The Batter: Why Buttermilk and Dutch-Process Cocoa Matter
Buttermilk does double duty here. Its acidity reacts with the baking soda to create lift, and it keeps the crumb soft without making the donut greasy. Dutch-process cocoa is darker and less acidic than natural cocoa, which gives a deeper chocolate flavor and a richer color. If you only have natural cocoa, swap the baking soda for an extra 1/2 teaspoon of baking powder to balance the acidity.
One common mistake is overmixing the batter. Stir just until the dry ingredients disappear. A few small lumps are fine — they'll bake out. Overworking the gluten makes donuts tough, and that's the opposite of what we want.
The Cooking Method: Oven-Baked vs. Stovetop Fried
For a camp-friendly version, the oven method is easiest. A donut pan gives the classic shape, but you can also pipe rings onto a parchment-lined baking sheet. The key is a hot oven — 375°F — and a short bake time. Don't walk away. At 10 minutes, start checking. The donuts should spring back when you press the edge.
If you want that fried-donut texture at a campsite, use a cast iron skillet with about an inch of oil. Heat it to 350°F (use a thermometer — guessing leads to greasy or burnt donuts). Drop the rings in gently, two or three at a time. Fry 45 seconds per side, then drain on paper towels. The oil temperature will drop as you add donuts, so let it come back up between batches.
The Glaze: Simple, Shiny, and Stable
A good glaze is about ratios. Too thin and it runs off. Too thick and it sets into a chalky shell. The recipe above hits a sweet spot. For extra shine, add a teaspoon of light corn syrup or a tiny pinch of salt to cut the sweetness. Dip the donuts while they're still warm — the heat helps the glaze adhere and sets it to a glossy finish in about 10 minutes.
If you're making these ahead, glaze them just before serving. Unglazed donuts keep in an airtight container at room temperature for a day. Reheat them in a 300°F oven for 3 minutes, then glaze.
Adapting for Camp Cooking
At a campsite with a propane camp stove, you can still pull these off. Mix the dry ingredients at home and store them in a zip-top bag. Pack the buttermilk in a small cooler. Use a lightweight donut pan or a cast iron skillet. The biggest challenge is temperature control — a windscreen helps keep the oil or oven steady. And always keep a lid nearby to smother any flare-ups if you're frying.
A Final Tip for Consistent Results
Weigh your flour if you can. A cup of flour can vary by 20–30 grams depending on how you scoop. Too much flour makes dry donuts. If you don't have a scale, spoon the flour into the measuring cup and level it off — never pack it down.
Bakery-quality donuts at home come down to a few deliberate choices: the right cocoa, a gentle hand with mixing, and a glaze that sets just so. Once you've got those down, you'll find yourself making them for breakfast, for dessert, or just because the morning needs a little chocolate.
Frequently Asked Questions
What makes these donuts taste bakery-quality?
The key is using a combination of Dutch-process cocoa for deep flavor and a hot oil flash-fry (or a hot oven blast for baked) that creates a crisp shell while keeping the inside tender. A simple buttermilk glaze adds tang and shine.
Can I make these without a donut pan?
Yes. Shape the dough into rings by hand or use a piping bag to pipe circles on parchment paper. For stovetop frying, you can also use a cookie cutter to cut out the center.
How do I keep the glaze from sliding off?
Let the donuts cool for 2–3 minutes after frying or baking, then dip while still warm. The residual heat helps the glaze set evenly. If it's too thin, whisk in a little more powdered sugar.
Bakery-Quality Chocolate Donuts at Home

These chocolate donuts deliver a crisp exterior and a soft, tender crumb thanks to a buttermilk-based batter and a Dutch-process cocoa boost. A simple glossy glaze finishes them with bakery-level shine.
- 1 3/4 cups all-purpose flour
- 1/2 cup Dutch-process cocoa powder (sifted)
- 1 teaspoon baking powder
- 1/2 teaspoon baking soda
- 1/2 teaspoon salt
- 2/3 cup granulated sugar
- 1/4 cup packed light brown sugar
- 1 large egg (room temperature)
- 1 teaspoon vanilla extract
- 3/4 cup buttermilk (room temperature)
- 4 tablespoons unsalted butter (melted and cooled)
- 1 1/2 cups powdered sugar (sifted, for glaze)
- 3 tablespoons heavy cream (for glaze)
- 1 teaspoon vanilla extract (for glaze)
- 2 tablespoons Dutch-process cocoa powder (sifted, for glaze)
- Preheat the oven to 375°F (190°C). Grease a 12-cavity donut pan with nonstick spray.
- In a large bowl, whisk together flour, 1/2 cup cocoa powder, baking powder, baking soda, and salt.
- In a separate bowl, beat the granulated sugar, brown sugar, egg, and vanilla until smooth. Add the buttermilk and melted butter; mix until combined.
- Pour the wet ingredients into the dry ingredients. Stir just until no streaks of flour remain. Do not overmix — a few lumps are fine.
- Spoon the batter into a piping bag or a zip-top bag with the corner snipped. Pipe the batter into the prepared donut pan, filling each cavity about 2/3 full.
- Bake for 10–12 minutes, until the donuts spring back when lightly touched. Let cool in the pan for 2 minutes, then transfer to a wire rack.
- While the donuts cool, make the glaze. In a shallow bowl, whisk together powdered sugar, 3 tablespoons heavy cream, 1 teaspoon vanilla, and 2 tablespoons cocoa powder until smooth. Add more cream a teaspoon at a time if needed for a thick but pourable consistency.
- Dip the tops of the warm donuts into the glaze. Let the excess drip off, then place back on the rack. Allow the glaze to set for about 10 minutes before serving.
Recipe: Bakery-Quality Chocolate Donuts at Home
Ingredients
- 1 3/4 cups all-purpose flour
- 1/2 cup Dutch-process cocoa powder (sifted)
- 1 teaspoon baking powder
- 1/2 teaspoon baking soda
- 1/2 teaspoon salt
- 2/3 cup granulated sugar
- 1/4 cup packed light brown sugar
- 1 large egg (room temperature)
- 1 teaspoon vanilla extract
- 3/4 cup buttermilk (room temperature)
- 4 tablespoons unsalted butter (melted and cooled)
- 1 1/2 cups powdered sugar (sifted, for glaze)
- 3 tablespoons heavy cream (for glaze)
- 1 teaspoon vanilla extract (for glaze)
- 2 tablespoons Dutch-process cocoa powder (sifted, for glaze)
Instructions
- Preheat the oven to 375°F (190°C). Grease a 12-cavity donut pan with nonstick spray.
- In a large bowl, whisk together flour, 1/2 cup cocoa powder, baking powder, baking soda, and salt.
- In a separate bowl, beat the granulated sugar, brown sugar, egg, and vanilla until smooth. Add the buttermilk and melted butter; mix until combined.
- Pour the wet ingredients into the dry ingredients. Stir just until no streaks of flour remain. Do not overmix — a few lumps are fine.
- Spoon the batter into a piping bag or a zip-top bag with the corner snipped. Pipe the batter into the prepared donut pan, filling each cavity about 2/3 full.
- Bake for 10–12 minutes, until the donuts spring back when lightly touched. Let cool in the pan for 2 minutes, then transfer to a wire rack.
- While the donuts cool, make the glaze. In a shallow bowl, whisk together powdered sugar, 3 tablespoons heavy cream, 1 teaspoon vanilla, and 2 tablespoons cocoa powder until smooth. Add more cream a teaspoon at a time if needed for a thick but pourable consistency.
- Dip the tops of the warm donuts into the glaze. Let the excess drip off, then place back on the rack. Allow the glaze to set for about 10 minutes before serving.